


Are you using WordFence to secure your WordPress application? Have you been doing some admin action, like scanning for some file, or loading lots of pages which keeps triggering the firewall and blocking you out?
Whatever it is you’d like to do, it can make a lot of sense to whitelist your IP address (or that of your business network) in order to stop this from triggering in future.
Table of Contents
How to Whitelist your IP in WordFence
Step 1 – Find your IP
The quickest and easiest way to discover your public IP address is to type into Google.com “what is my IP address“. You’ll see it at the top. Highlight and copy this address. It will look like 111.111.111.111 or similar.
Copy your IP address for later.
Step 2 – Open WordPress admin
Navigate to yourdomain.com/wp-admin – and login. If you are currently locked out, you may need to add your email address and go through the WordFence recovery process (open email, click link) first.
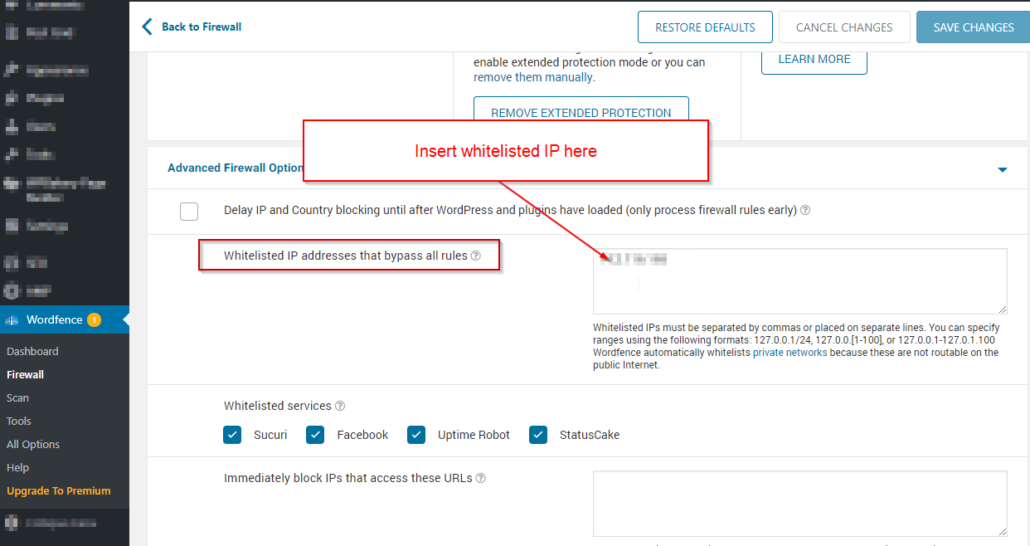
Step 3 – Navigate to WordFence > Firewall > All Firewall Options
Hover over WordFence in the left hand menu, click on Firewall from the screen which pops out.
Then on the screen which opens, click on “All Firewall Options” (there’s a gear icon next to this).


In the screen which follows, the top option should be a box to input “Whitelisted IP addresses that bypass all rules” – add your copied IP address (from above) on a new line in this box, and hit “Save Changes” in the blue box at the top right.

That should be it!
If you’ve done this successfully, and you have a fixed IP (not always the case, depending on your ISP or office network) this should have whitelisted you forever in future to do what you like without triggering any rules!
Leave a comment below (public) if you have any questions or issues with this process.
Please Note – Your IP May Not be Fixed!
Working with a remote team, we know all about IP addresses not being fixed when it comes to our security settings. Some of our team use a VPN (which does have a fixed IP) to work around this issue – then you can whitelist that. If you’d like, we resell some excellent VPN services which can enhance your security around the web, as well as providing you with a fixed IP address. Get in touch if you’d like this for your workplace or business.
Want us to do it for you?
If you’d like us to assist with your WordFence setup, contact Silicon Dales today.
i did this and even while logged in in one browser im try to figure out other problems with users not getting there emails when they press lost password on another browser, it still triggers a lockOut.
Is there a way to allow logins ONLY from whitelisted IP addresses?
Excellent question!
We tend to do this via either htaccess (or nginx.conf) rules or to implement a firewall at DNS level, which blocks all but approved IP address from the wp-admin folder and the wp-login.php page. Note it is often also necessary to set an exclusion for wp-admin for Ajax, if you use this anywhere.